In this blog, we are gonna cover the possible methods to import PST to Office 365. These methods would be the Network upload method, Drive shipping method, and automated method.
Users sometimes import PST files to Office 365 to make them accessible to desired users. If you are from one of them, you are at the right place.
Microsoft is the established tech giant and its Office 365 service is emerging as the leading cloud-based service. Not only big businesses but also the small firms are using the Office 365 services. The flexible pricing and usage are the reason.
There are no geographical limitations and downtime situations in this cloud-based utility. This is what enables users to use it anytime, either it is midnight or midday. The all-time availability of Office 365 contributes to the smooth workflow of businesses.
An increase in migration to cloud-based platforms, especially Office 365, has been seen in recent years. There is no match to Office 365 features, it has remarkable features, which are attracting business heads from all over the world.
Manual methods to import PST to Office 365:
There are two manual methods available by Microsoft itself. These methods are no doubt genuine but don’t provide security and desirable import to the required level, and hence, third-party tools are occupying their space.
First, let’s have a look at both the types of manual methods available to import PST to Office 365. One is known as Network Upload, and the other is called Drive Shipping.
Network Upload in a Nutshell:
The network Upload method requires users to upload PST files in the temporary Azure storage location in the MS cloud. And then to use MS 365 import service to import respective PSTs to the users’ mailboxes.
Detailed Procedure to Import PST to Office 365:
I am gonna tell you this method in Five broad steps to import PST to Office 365 to make it look easy for you.
Step 1: Install the Azure tool
- Visit https://compliance.microsoft.com/ and sign in here using Admin’s credentials.
- On the left of this wizard, enter Information Governance and then hit Import.
- Hit on + the New import job button, a wizard will open.
- Give a name to the PST import job and click Next. (Use small letters, numbers, underscores, and hyphens. Capital letters and spaces are prohibited here)
- In the DO you want to upload or ship your data? Wizard, click the Upload your data radio button and proceed with Next.
- Now a window will pop up; make a click on the Show Network Upload SAS URL, hit on the clipboard to copy the URL, and paste the same on the Notepad. Once it is complete, download the Azure AzCopy tool.
Note: The Azure Azcopy is an executable file so it would not install. Close the tab after its download.)
Step 2: Import PST to Microsoft 365
On your system, open the Command Prompt.
Run the command: azcopy.exe copy “<Source location of PST files>” “<SAS URL>” to upload PSTs on Office 365.
Step 3: Make a CSV File for Mapping
Till now, the PST file residing in the Azure tool. And now on, you have to make a CSV file having the given below details to import PST to Office 365 mailboxes. I’ll provide you with the specimen for the CSV file beneath the description for better understanding.
You need to list head row with these headings using comma (if using Notepad):
Workload, File Path, Name, Mailbox, IsArchive, TargetRootFolder, ContentCodePage, SPFileContainer, SPManifestContainer, SPSiteUrl
Note: If using Notepad, enter these as it is, do not give space between any of the listed terms. And if making this file in MS Excel, enter these headings in the separate boxes along the row.
CSV file specimen using Notepad:

You are needed to fill the boxes down to the respective headings as follows:
Workload: Service to which uploaded to, in short type: Exchange.
File Path: Give a path where your PST (which you uploaded before in SAS URL) is saved. You can leave it empty if left empty in SAS URL.
Name: Provide PST file names already uploaded in the Azure tool.
Mailbox: Give the mailbox address to send the respective PST file.
Is Archive: You can import PST to Office 365 archive of users by using this section. If you want to move PST to archive, enter TRUE otherwise, enter FALSE, and the file will move to the public folder.
Target Root Folder: Enter the folder name where you want to save the imported PST file. The PST file will upload to the new folder if left blank.
You can leave the entries of these columns: ContentCodePage, SPFileContainer, SPManifestContainer, SPSiteUrl.
CSV file specimen using MS Excel: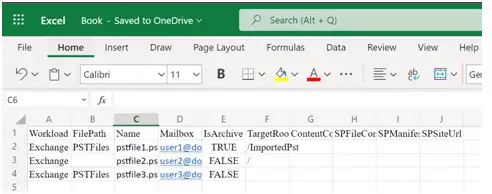
Step4: Import PST to Office 365 mailboxes:
- Visit https://compliance.microsoft.com and sign in using admin credentials.
- From the left pane, click Information Governance then Import option, and at last hit New Import Job.
- Give a name to the import job. (Do not accept capital letters.)
- Choose to upload your data option and subsequently hit Next.
- There will be two checkboxes: I’m done uploading my files, and I have access to the mapping file; check them both and proceed.
- Hit Select mapping file, add so created CSV file, and then hit validate. When the CSV validates, go through the terms and conditions checkbox, click it, and hit Save.
- Tap on close after creating the import job successfully.
A status page will pop up with the status Analysis in Progress, click refresh to update the status, and when the status wizard shows Analysis completed, it means your job has been created and is now ready for import.
Step5: Filter and import PST to Office 365:
- Hit the import tab from the left pane, click import jobs, and select import to Office 365.
- Filter your data page will appear, click the radio button: Yes, I want to filter it before importing to filter the data of the PST files. Otherwise, click the radio button: No, I want to import everything and consequently hit Next.
- Now click on the Import data tab to start processing the import job.
(After that, you can check the status of the ongoing process in the import PST file page, click refresh to update status.)
Drive Shipping in a Nutshell:
Paste the PSTs to the BitLocker-encrypted hard drive to physically send them to Microsoft. And when MS receives the drive, it uploads the data in temporary Azure storage, then uses Microsoft 365 import service to import PST to Office 365.
Drawbacks of Manual Methods:
Well, you have seen the Network upload method, and I know it would be a complex, lengthy and undesirable method. And here Drive Shipping method is more complex and confusing than that. These are a few of the points that for sure will seem unfavorable to you.
- The network upload and drive shipping methods are very complex and time-consuming approaches. Especially in the drive shipping method, where users send the PST files physically.
- If the migration in the first attempt fails at some point, the next time you start the process, the duplicity will take place.
- Chances of human error in the manual method are high and consequently can result in a data loss scenario.
- Technical expertise is required, and sometimes technically versed people also get entangled in these manual methods.
- These two manual methods do not prove handy when it comes to migrating large-sized PSTs.
So, to not get entrapped in these kinds of undesirable situations, let’s jump straight to the easiest and most suitable way instead.
Using a Professional Tool – PST to Office 365 Migration Tool
You are suggested to use the professional PST import tool for PST to Office 365 migration which provides you multiple features. Weeom PST to Office 365 Migration tool is one such tool with an enhanced solution to migrate Outlook to Office 365. This tool comes with a deadly combination of advanced algorithms and a simple GUI. It is not only limited to migration but also repairs the corrupted PST/OST. First, let’s get into its work concerning a PST migration to Office 365.
Procedure to migrate PST to Office 365:
- Download the Weeom PST to Office 365 Migration tool, install it on your PC/Laptop and open it.
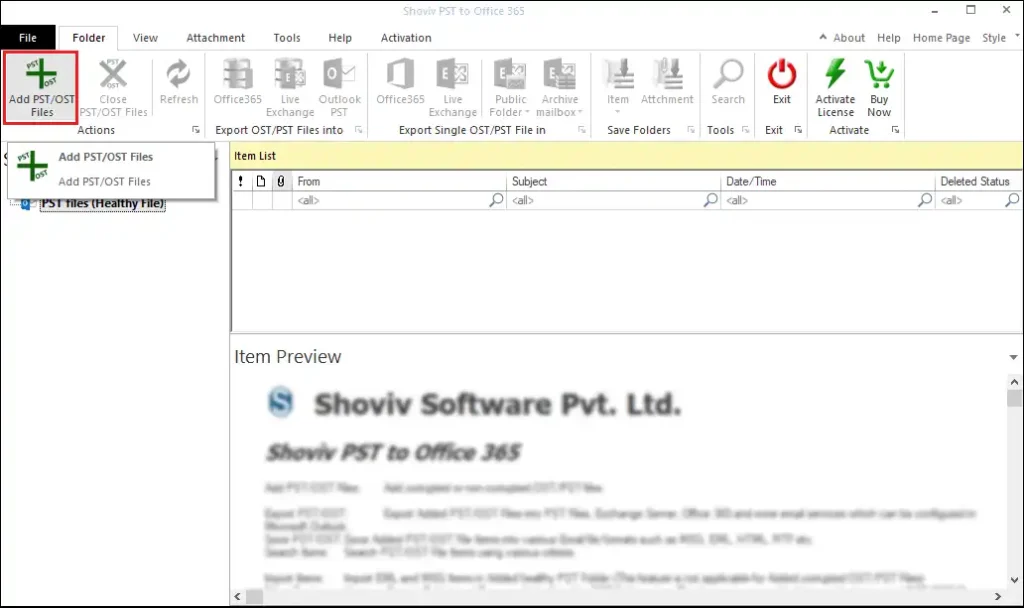
- Hit Add PST/OST files icon from the ribbon bar.
- A wizard will appear where you will have two radio buttons:
- Healthy PST files
- Corrupted OST/PST files
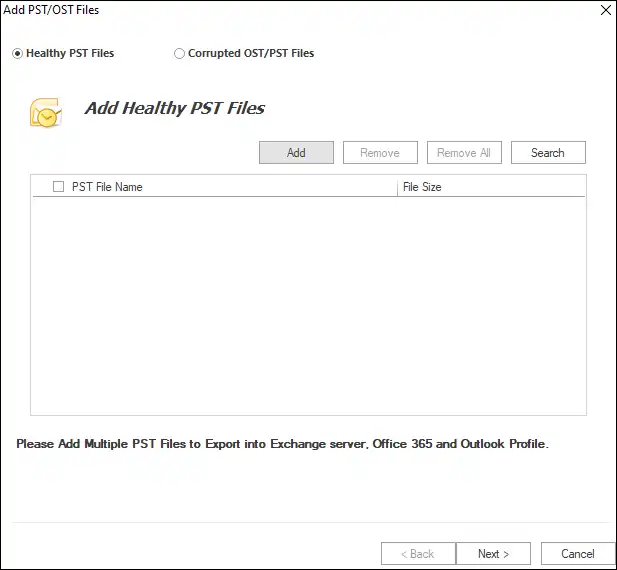
Click on anyone and add the respective criteria of a file using Add button and hit Next afterward. You will see the added files in the selection list that appeared on the left pane.
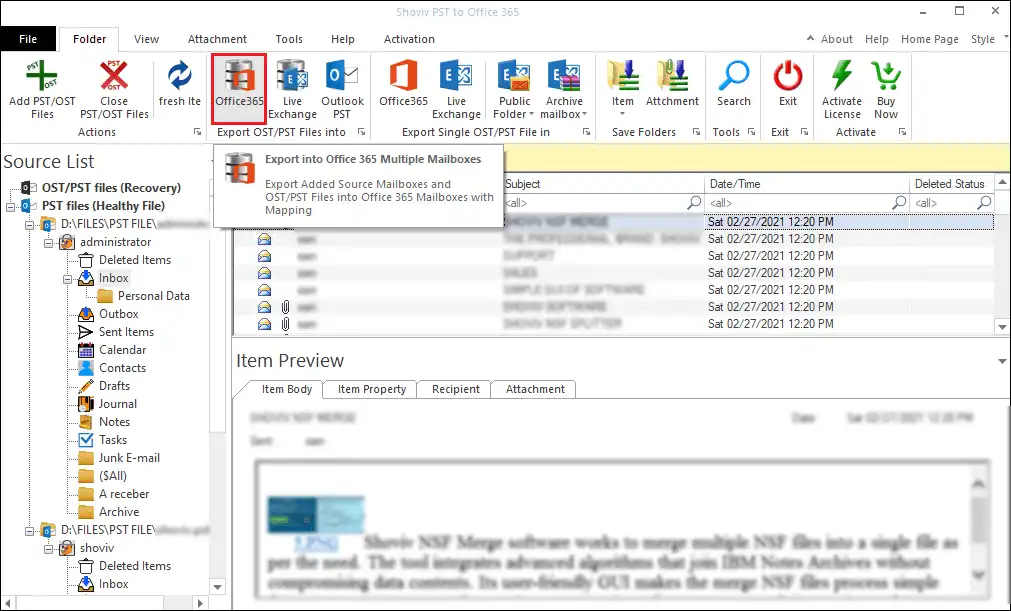
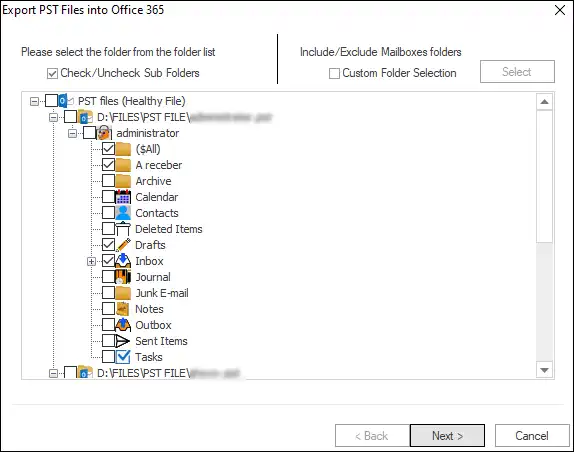
- Now hit Office 365 from the ribbon bar.
- A list of sub-folders will appear check/uncheck them suitably, and consequently hit Next.
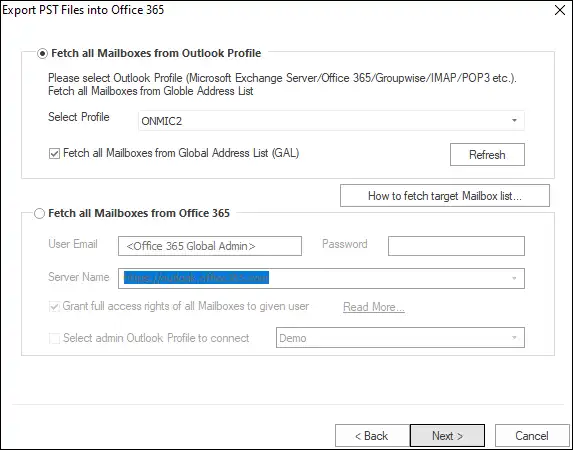
- Then choose any of the radio buttons by clicking beside any of these options: Fetch all mailboxes from Outlook Profile and Fetch all mailboxes from Office 365. Provide the credentials for the same and hit Next.
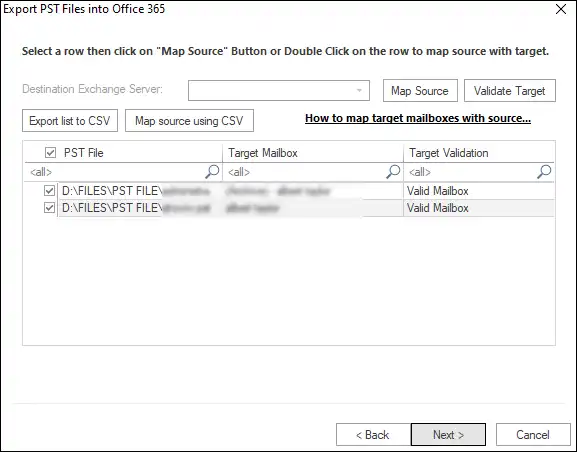
- Map the source with the target mailboxes and subsequently hit Next. (You can also validate your targets here.)
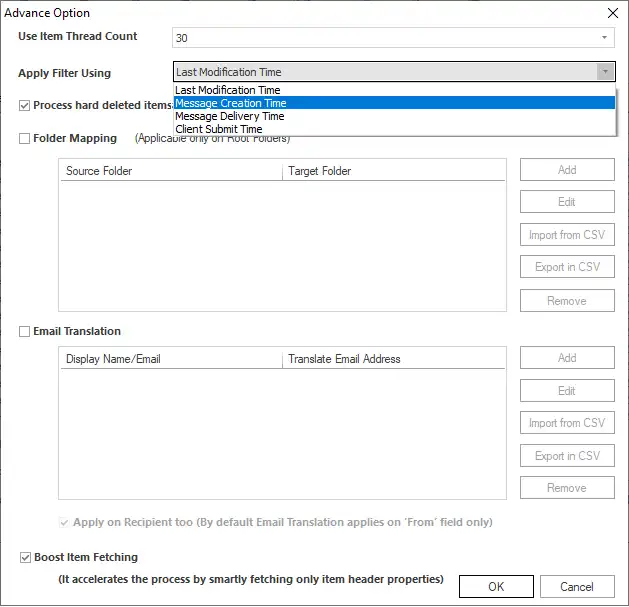
- You can use filters based on Message class and date and jump to Advance options by hitting the Advance option tab.
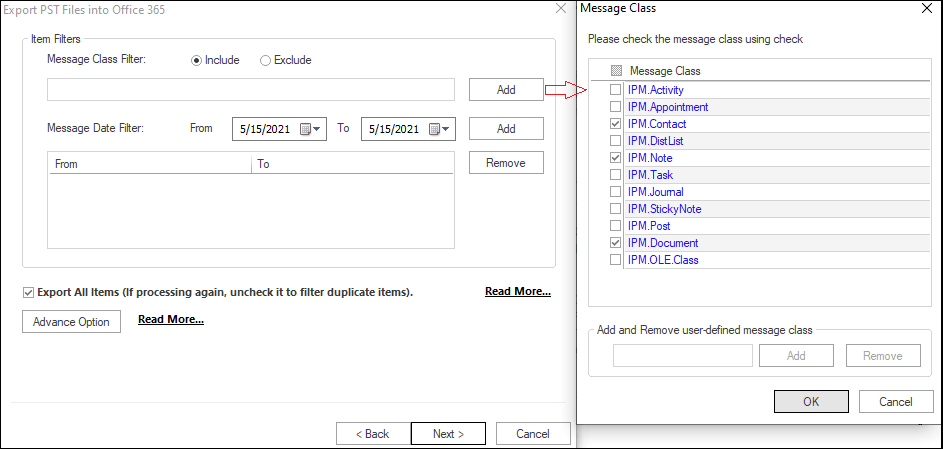
- In the advance option tab, you are available with the Folder Mapping, Email Translation, item thread counts kinds of options, deal with them accordingly, and hit OK to get back to the Filter wizard and hit Next consequently to proceed further.
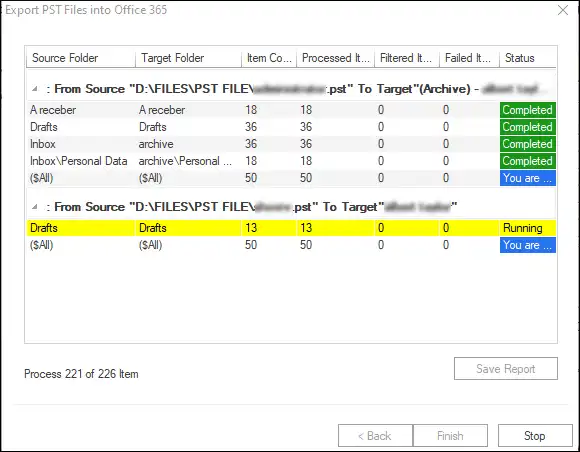
- The PST to Office 365 migration process will start. You can save the report after it completes. Hit Finish when done.
Quick Steps:
Step1: Click on Add PST/OST files, add PSTs, and hit Next.
Step2: Hit Office 365 from the ribbon bar.
Step3: Check-uncheck folders accordingly and proceed.
Step4: Choose to Fetch mailboxes from Office 365 or Outlook and provide credentials.
Step5: Map source with the target mailboxes.
Step6: Use filters based on Message class and date.
Step7: Hit the Advance option to jump to the advance option wizard.
Step8: Get back to filter wizard from Advance option wizard by pressing OK.
Step9: When you hit Next from the Filter wizard, the PST to Office 365 migration starts.
Features that Professionals look for:
- Advanced Algorithm
Weeom PST to Office 365 tool provides a swift way to import PST to Office 365 without any hassle and alteration in the metadata. On top of that, this feature provides speedy migration.
- Corrupted PST Migration
This tool is capable of repairing the corrupt PST/OST files also recovering the hardly deleted items of them. Once repaired, they can be migrated to Office 365.
- Import Multiple PST/OST Files
You can add any number of PST files for a single process. Multiple additions of PSTs save the time of the users.
- Excludes duplicity
This tool prevents duplicity in the data when the PST is imported to the Office 365 mailbox. This feature prevents duplicity already occurring in the file and also when the same PST is needed to import again to the same target.
- Preview option
You can see any item of added PST before processing them for migration to Office 365. You can preview your healthy as well as unhealthy PSTs on it and this helps you exercise the more accurate and required migration.
- Extra-large PSTs
Usually, the PSTs associated with the businesses are large and sometimes many, and hence this tool is designed taking into consideration these conditions. It takes nominal time to migrate numerous and large-sized PSTs without even a bit of alteration.
There are many more features available in this tool that you can experience for free in its demo version with access to its complete features. This demo version allows you to process the first 50 items per folder.
FINAL SAYINGS:
The manual methods available for PST to Office 365 migration tasks are Network Upload and Drive Shipping. However, these two tasks are not recommended upon their time-consuming and complex character.
You can use Weeom PST to Office 365 Migration tool that imports PST to Office 365 proficiently in your commendation. In the end, it is totally up to you with which PST migration tool you wanna take your final leap.