If you’re looking for a way to export Office 365 mailbox to PST, this tutorial is for you. Here I’ll discuss three known solutions by utilizing which you can create a local copy of your Office 365 mailbox and can import it into Outlook using the Import/export wizard.
We all know what Office 365 is and why it is used, so I’ll not waste your time and will move straight to the point. I’ll start with the eDiscovery tool.
1. eDiscovery to Export Office 365 Emails to PST File
Before I start, I have to mention that the eDiscovery tool works well with internet explorer, and for other web browsers, you need to install the click once extension.
Now let’s start the Export Office 365 mailbox to PST process.
Get permission to become a member of the eDiscovery group role:
- First, log in to your Office 365 account and access the Microsoft 365 Admin center.
- Now navigate the Security and Compliance center option to continue the process.
- Next, go to the Permission tab and check the eDiscovery Manager option. Then, add yourself as a member to export mailbox to PST from Office 365.
- In the eDiscovery manager prompt, click on the edit button of the eDiscovery Administrator option and add the Export role.
Now the user needs to move towards the process to export Office 365 mailbox to PST to perform a content search. Just follow the below-mentioned process to create the new search:-
Content Search
- Click on the App launcher button and choose Search and Investigation · Here, click the Content Search option from the dropdown menu. If you’re missing the content search option, wait for at least 24 hours as changes in the e-discovery permission take up to 24 hours. Now, click on the + New Search option. The search window lets you specify which mailbox data you want to export. It also provides an option to search all locations; ticking this will search all the SharePoint and public folder databases. Doing this will take some extra time.
- Choose mailboxes according to your need and click on the Save and Run Apart from location filter, eDiscovery lets you use keywords to specify data for backup.
- Then, enter the name and description for your search and click the Save After clicking on the Save option, the mailbox search will run in the background.
Export Results
- Now go back to the Search window, click on the Refresh button and choose your search.
- You can see the status of the search in the next window. If completed, then click More and hit on the Export Results
- A new window will pop up. Here you can choose whether to include encrypted files or the Output option to export mailbox to PST from Office 365. I’ll suggest you go with the default option as it’s the most reasonable for Export Office 365 mailbox to PST files.
- Now, copy the Export key from the popup, and click the Download Result
- Now, the eDiscovery PST Export tool will start. Paste the copied export key here, then browse the location to export Office 365 mailbox to PST.

- At last, click on the Finish button, and your mailboxes will start exporting into the local drive.
Drawbacks of eDiscovery export tool
The Manual option is always a solution, but it’s a lot of extra work if you’re not blessed with technical expertise. It comes with some drawbacks as mentioned below.
- Content search option is missing: As I have mentioned above, sometimes you may miss the export/content search button. It happens because your account doesn’t have an assigned import/export role to your mailbox.
- You can use the following PowerShell command to assign import/export mailboxes quickly:
- New-ManagementRoleAssignment –Role “Mailbox Import Export” –User “user name”
- Export Result doesn’t support: The eDiscovery export is performed with the click once extension. Also, it only works in Microsoft Edge or Internet Explorer browsers.
- Creates Duplicate Items: Duplicates are common when exporting to PST. It’s because eDiscovery frequently detects several copies of the same email message and handles them as independent objects by default. By Enabling the de-duplication option, you can easily avoid it. But the de-duplication method isn’t perfect. It has certain flaws: designate some unique things as duplicates, preventing them from being exported.
More high risks: There are more glitches with the eDiscovery method.
- Some of your PST file items may get missing
- High chances of PST files getting corrupt
- Takes too much time and has the risk of data loss
- Requires technical expertise
eDiscovery utility has a few hitches. So, there is no easy cure for these issues. Using an out-of-date PST file format for backup or archiving is, in fact, a bad idea.
2. Export Office 365 Mailbox to PST using Import/Export Wizard
It’s another solution and is better than eDiscovery. But I’ll recommend this solution only for individuals, not a reliable one for MNCs and administrators.
In this way, you have to create an Outlook profile of your Office 365 mailbox and then export that Outlook profile’s data into Outlook PST format.
I’ve divided this method into two phases, so it’ll be easy to understand for you. But before starting the process, I suggest this only for individuals.
PHASE1: Create Outlook profile for Office 365 account
- Launch Outlook and click on the New option.

- Next, provide a name for your profile and click Next.
- Then select Manual setup or additional server types radio button and click Next.
- Following choose IMAP or POP option and then provide the asked information in the Next wizard.
- Once done with the information, click the More Settings option and add the incoming and outgoing server in the Advanced tab.
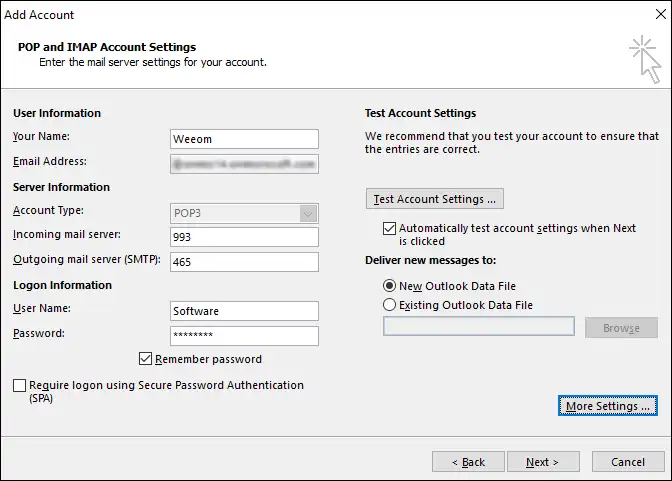
- At last, click on the Test account setting option. Now you have successfully created an Outlook profile for your Microsoft 365 account.

PHASE2: Export Outlook Profile into Outlook PST
- Open Outlook and go to the File tab.
- From here, select the Open & Export option and pick the Import/Export option.
- Following choose Export to a file option and hit Next.
- Next, choose the file format (Outlook data file .pst) and select the folders you want to export in the Next wizard.
- Now, choose the path to save the exported PST files and select the Duplicate option as per your requirements.
- Once done with all steps, click on the Finish button.
That’s it! The process is easy to navigate, but problems with this method are you have to move data from Microsoft 365 mailboxes’ separately, which will consume extra time and effort. Also, you cannot export Meta properties such as views, permissions, auto-archive, message rules, and so on.
You’ll need a third-party program to Export Office 365 mailbox to PST file without all of these solutions drawbacks.
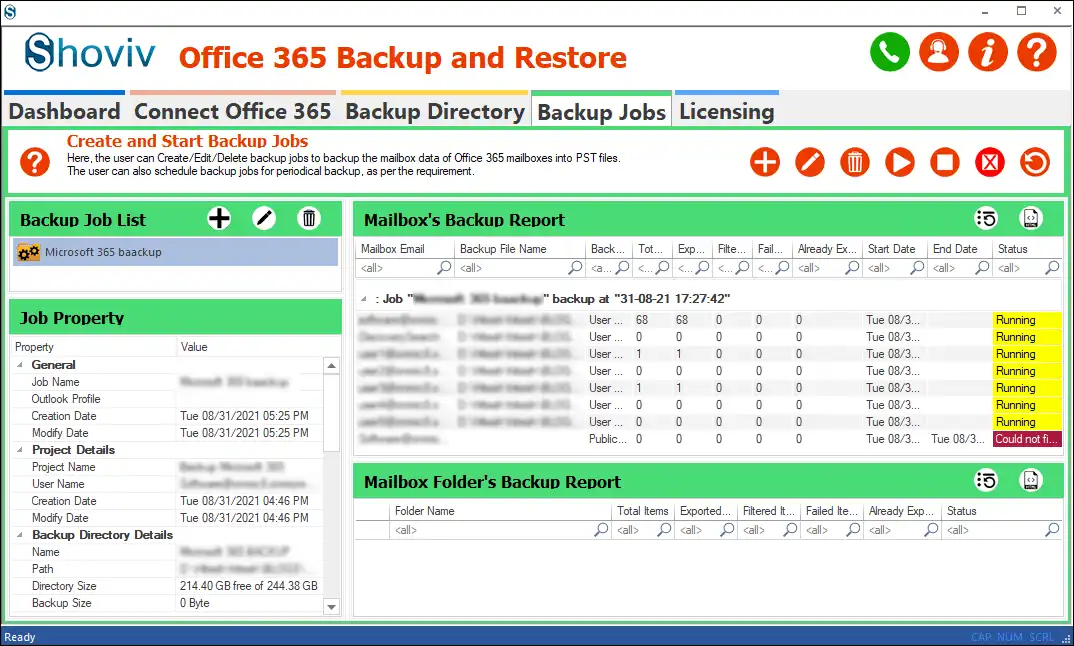
Using Office 365 Backup Tool to Export Office 365 mailboxes
For a better experience and to make the Office 365 export mailbox to PST easy and desired, use a third-party tool like Office 365 backup and restore tool. The tool enables users to Export Office 365 mailboxes to PST files without creating eDiscovery search and usage of PowerShell commands.
The Weeom software offers an inbuilt scheduler feature to automate the backup process. Using this feature, you can have the backup of Office 365 mailboxes at your own time, even if you’ve forgotten it.
Export Office 365 Mailbox to PST
- Install and open the software in your system.
- Click Connect Office 365 and enter credentials.
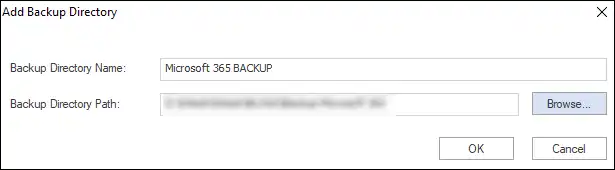
- Create Backup Directory to store backup files.
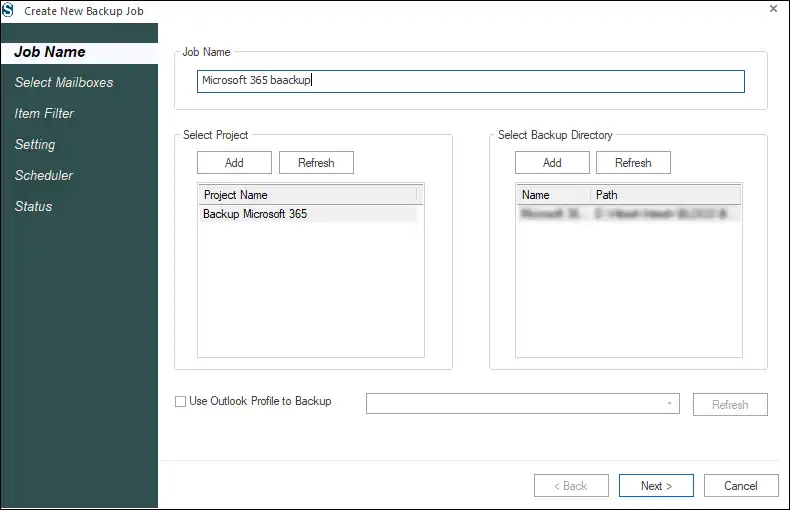
- Enter job name and select mailboxes to backup.
- Use the filter option to exclude unwanted items.
- Set desired thread count and PST file size.
- Use the Scheduler option for timely backup.
- Review the settings and run the backup job.
Export Office 365 Mailbox to PST Stepwise Process Explained:
- First, install and launch Office 365 Backup & Restore Tool.

- Now click on the Connect Office 365 option and provide the Office 365 administrator credentials who has all mailboxes’ delegate rights.

- Following click on the Backup directory and provide backup directory name and path; all your backup files will store here.
- Now go to the Backup job tab, then provide the Job name and select the backup directory. Here you can also choose an Outlook profile to backup.
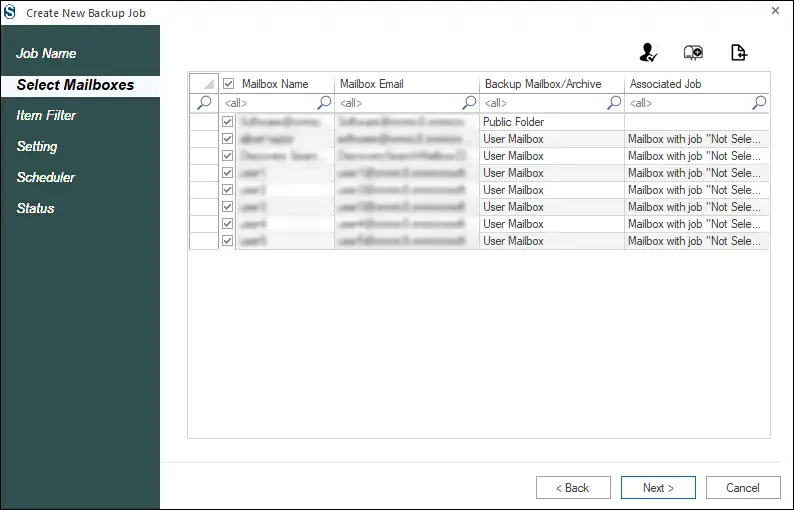
- In the next window, choose the Office 365 mailboxes for backup. You can also provide delegate rights to the selected mailboxes.
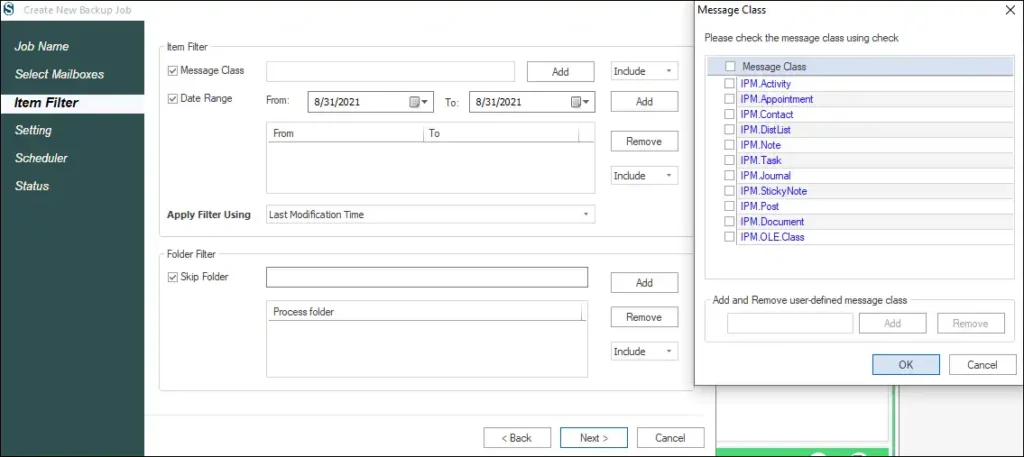
- In the Filter window, you can exclude unwanted Office 365 items on their message class and date range criteria.
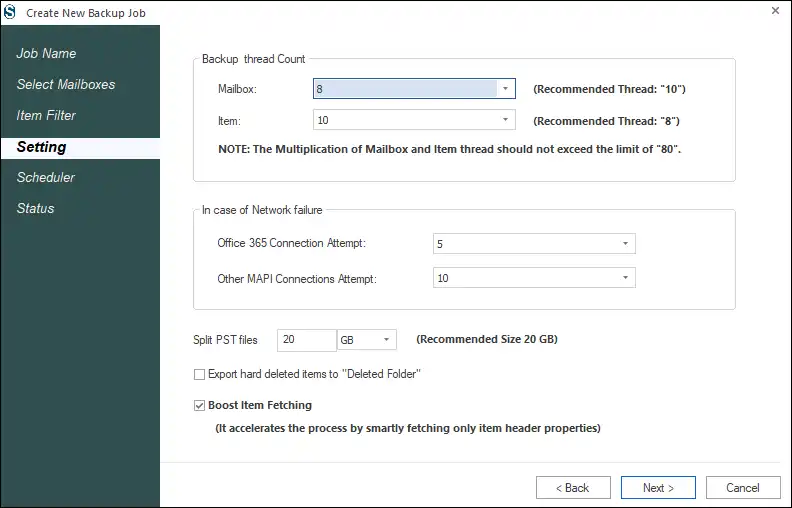
- Following set the thread count for mailbox and items. Here, you can set the size for the PST file and choose whether to export deleted folder or not.
- In the Scheduler wizard. You can schedule the process daily, weekly, and monthly basis. Also can choose a specific date and time for backup. Select the Run job immediately button to run your backup job.

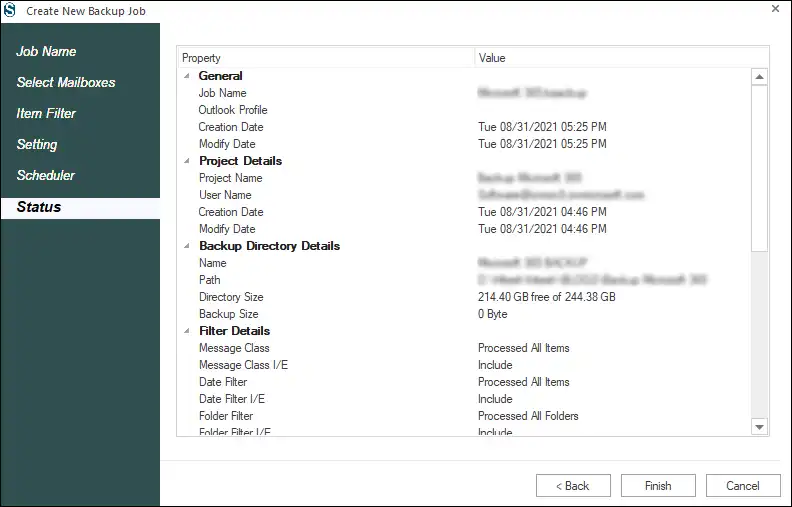
- Now, the software will display all the backup settings. If all is right, click the Finish. Otherwise, click Back to change.
- After creating the backup job, you can run it anytime. Also, the software job-based program, so you do not need to create the backup job again and again. You can run and edit the job anytime.
It’s an effortless process to export Office 365 mailbox to PST files. Your Microsoft 365 data is safe from where you can retrieve your data anytime. The good thing is the software also allows restoration facilities without spending a single penny.
The Closure
Cloud is the future of email servicing, and Office 365 is the best example. Almost every fourth businessperson prefers Microsoft 365 to collaborate and communicate with clients and colleagues. There is no doubt that your data is your responsibility, so it’s better to have a complete backup. Office 365 Backup and Restore tool is the best to have a complete and automated backup of Microsoft 365.